
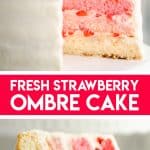
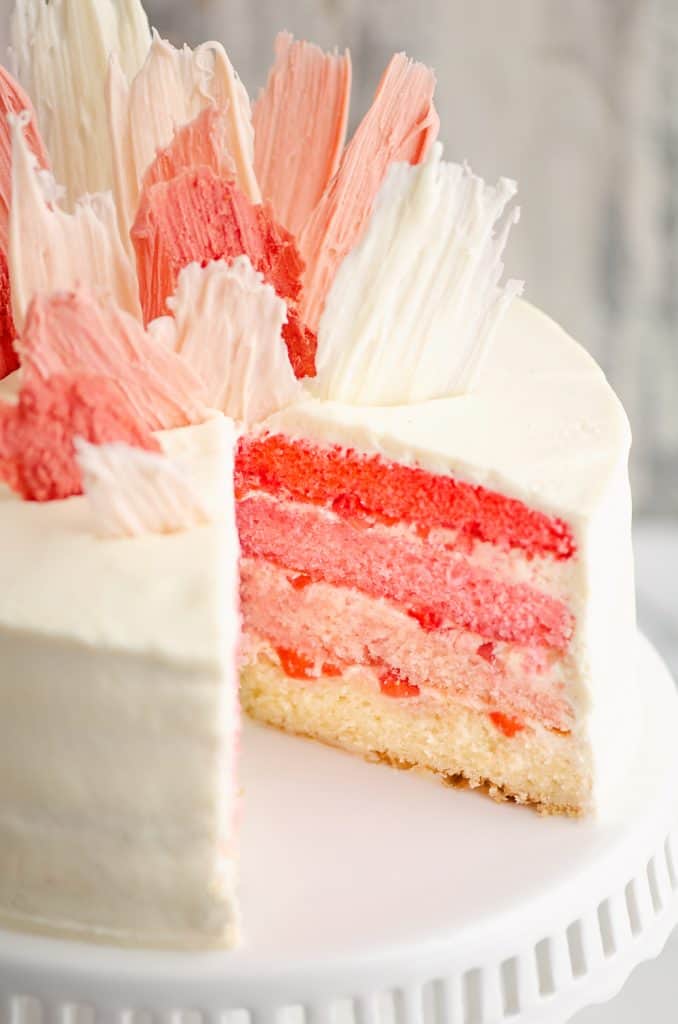
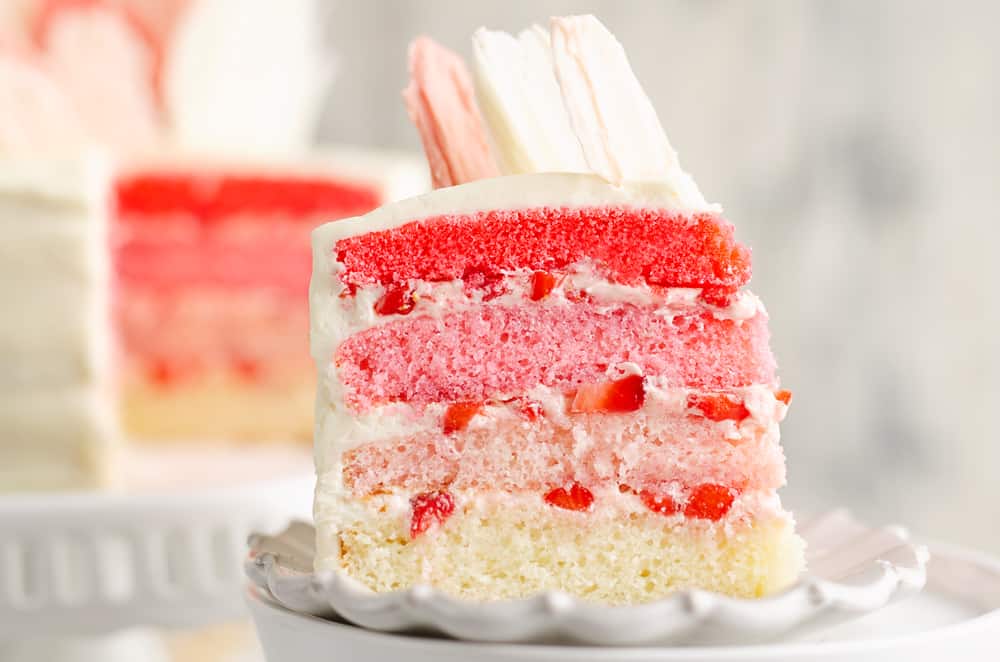
Fresh Strawberry Ombre Cake is a delicious and moist homemade pink cake layered in four tiers with a sweet strawberry buttercream for an impressive dessert on any special occasion!
Fresh Strawberry Cake
My twins celebrated their second birthday recently with this beautiful fresh strawberry cake! They both love fruit and their absolute favorite is strawberries. They could put a whole quart of strawberries down in one setting if I let them…but I don’t. Strawberries are way too expensive this time of year for that kind of gluttony! haha
When I was trying to decide what kind of cake to make for their party, an ombre birthday cake with fresh strawberries seemed like the perfect fit.
Cake with Fresh Strawberries in the Middle
This strawberry cake, doesn’t actually have any strawberry flavor inside the cake at all. Unlike the fake box mix strawberry cakes with their overly sweet flavor, this simple and delicious vanilla cake is layered with fresh strawberries in the middle.
I love desserts with fresh strawberries. It is such a great natural sweetness perfect for everything from strawberry bars to mini strawberry pies.
While it always sounds overwhelming to most people to make a homemade cake, it really isn’t all that much more difficult than a box mix at the end of the day. You dump all the ingredients in a bowl and mix it up!
Pink Ombre Cake
This cake does require a few extra steps to turn it into a beautiful pink ombre cake, but it is worth the effort. If you are looking for amazing homemade cake with minimal effort, then I would recommend these birthday cupcakes. They use the same moist vanilla cake but are quick and easy to make into cupcakes.
I never claim to be any sort of master baker. I am a cook at heart, but every now and again, it is necessary to whip out the baking skills to make a cake for a special occasion. This is my go-to vanilla cake that never disappoints.
What is an ombre cake
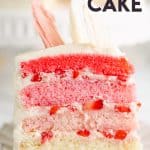
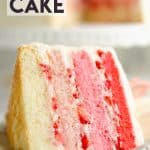
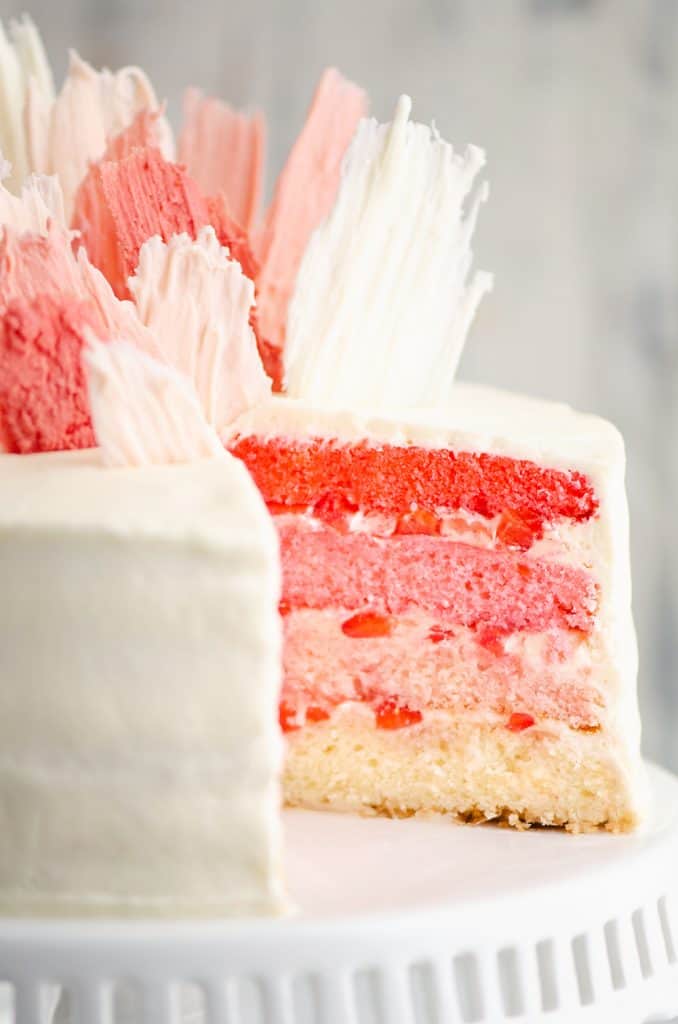
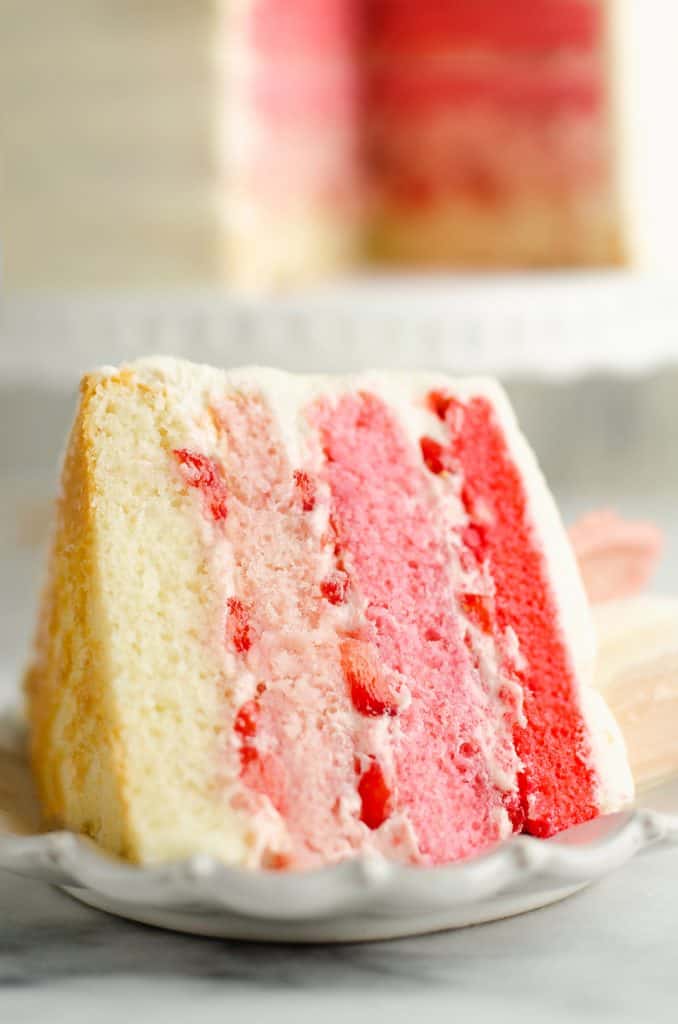
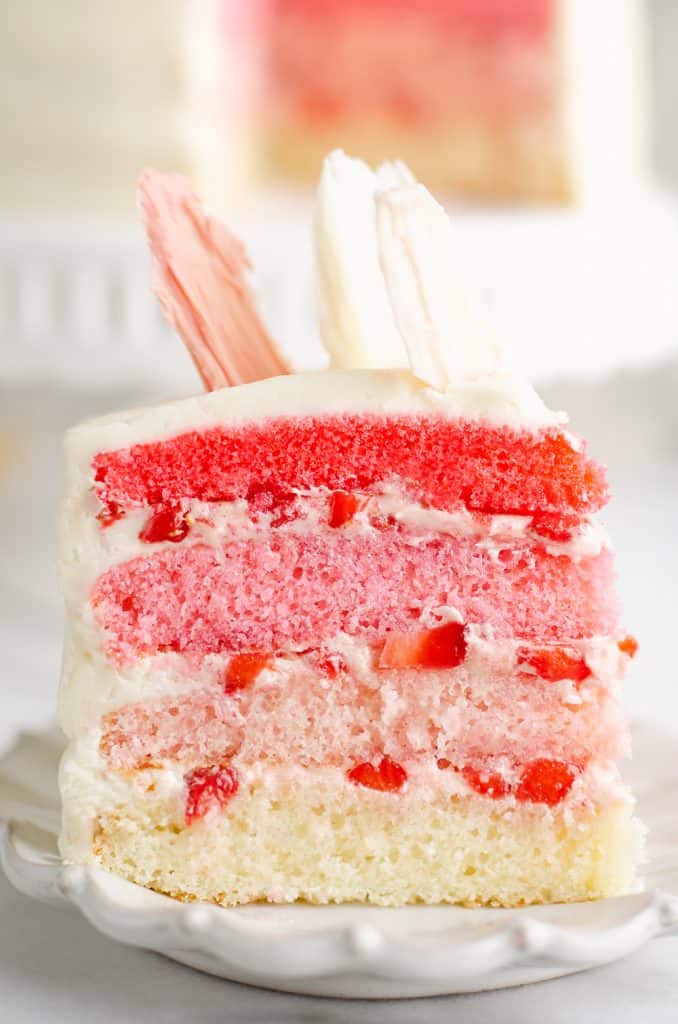
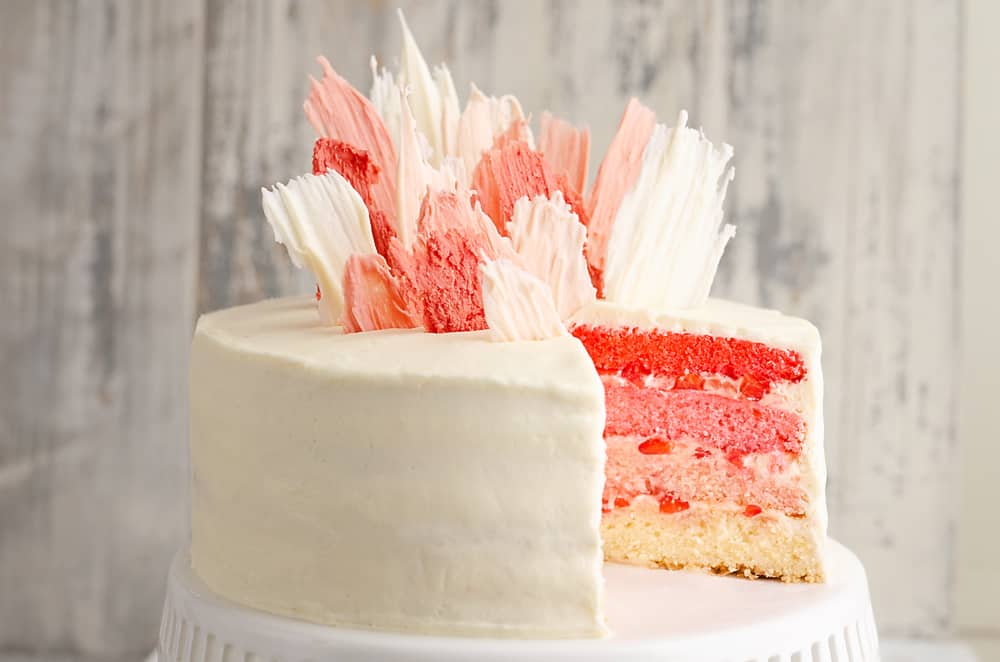
The definition of ombre is having tones of color that shade into each other, graduating from light to dark. That is exactly what this cake does with four tiers of pink vanilla cake increasing in color saturation with each layer.
Ombre cakes are actually easier to make than a multi colored cake like rainbow, hence why my boy girl twins got a pink cake at the end of the day. I debated doing four different colors from the party theme, but I didn’t feel like making three extra dishes. I loathe washing dishes.
What you need to make a pink ombre cake
- 4 round cake pans
- Vanilla cake batter prepared
- Buttercream recipe
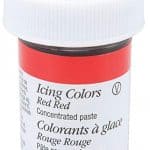
- Red gel food color
Whenever you are dying foods, I highly advise that you use gel or paste dyes and avoid the water based colors. Water based colors start to dilute batter and frosting and don’t provide a rich saturated color like gel.
How to make an ombre cake
The base of an ombre cake is a vanilla cake batter. Box mix would work for this ombre cake as well but I will reiterate that it is totally worth the extra five minutes of effort to make this vanilla cake from scratch. The texture of the crumb and overall flavor is just so much better with homemade cake.
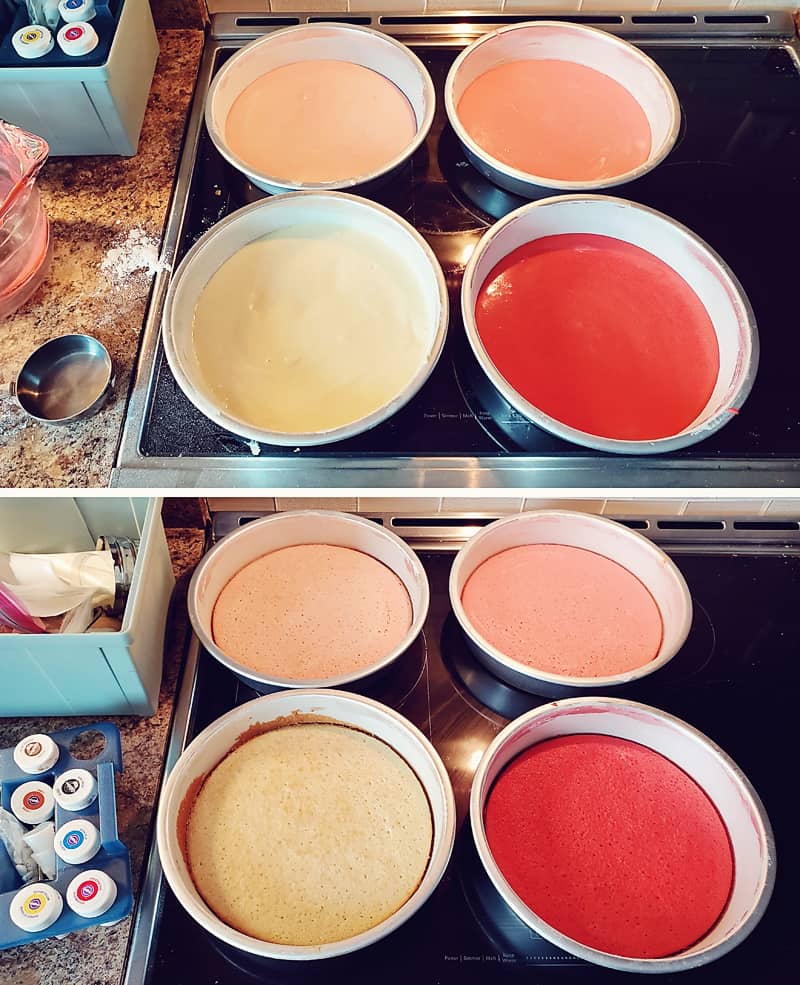
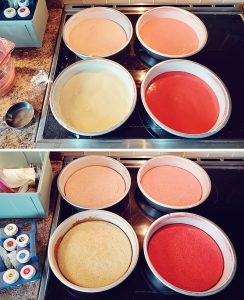
- Prepare your vanilla cake batter. Add 1/4 of the mixture to a round cake pan that has been buttered and floured.
- Add a TINY amount, approximately 1/16 tsp. of red gel food color and mix until the color is an even light pink.
- Scoop 1/3 of the batter into the next buttered and floured round pan.
- Add 1/8 tsp. red dye to the remaining batter and mix for an even medium pink.
- Scoop 1/2 of the batter into the next buttered and floured round pan.
- Add 1/4 tsp. of red dye to the remaining batter and mix until it is an even bold pink color.
- Pour the remaining batter to the last round pan.
- Bake the four cakes until they are just lightly golden on the edges and a toothpick inserted in the center comes out clean.
- Once the cakes are cooled, stack them from lightest to darkest with a layer of buttercream between each layer.
- Ice the outside of the cake with a thin layer of buttercream for a crumb coat.
- Finish the cake with an even thick layer of buttercream.
Best Strawberry Cake
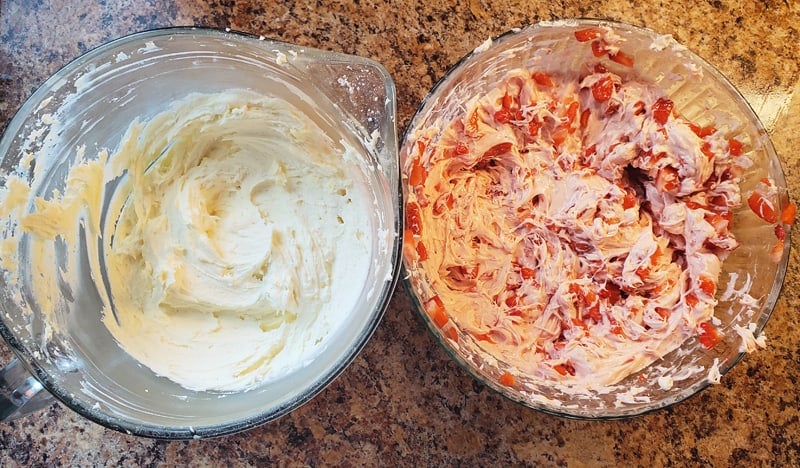
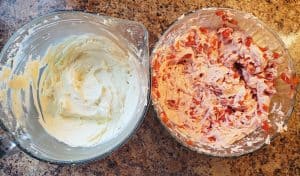
To turn this pink ombre cake into the best strawberry cake, it take just one extra step. After you prepare your buttercream recipe, remove 1/3 of the frosting into a separate bowl with finely chopped fresh strawberries. I do this before I add the 2 Tbsp. of milk to the buttercream, so it is still very thick. The juices from the strawberries will naturally thin it out.
Add the milk to the plain buttercream and beat until light and fluffy. If the cakes are mounded in the center at all, use a large bread knife to careful cut the top off the center so they are flat. When I used a 9 inch round cake pan, they were nice and flat on top from the small amount of batter.
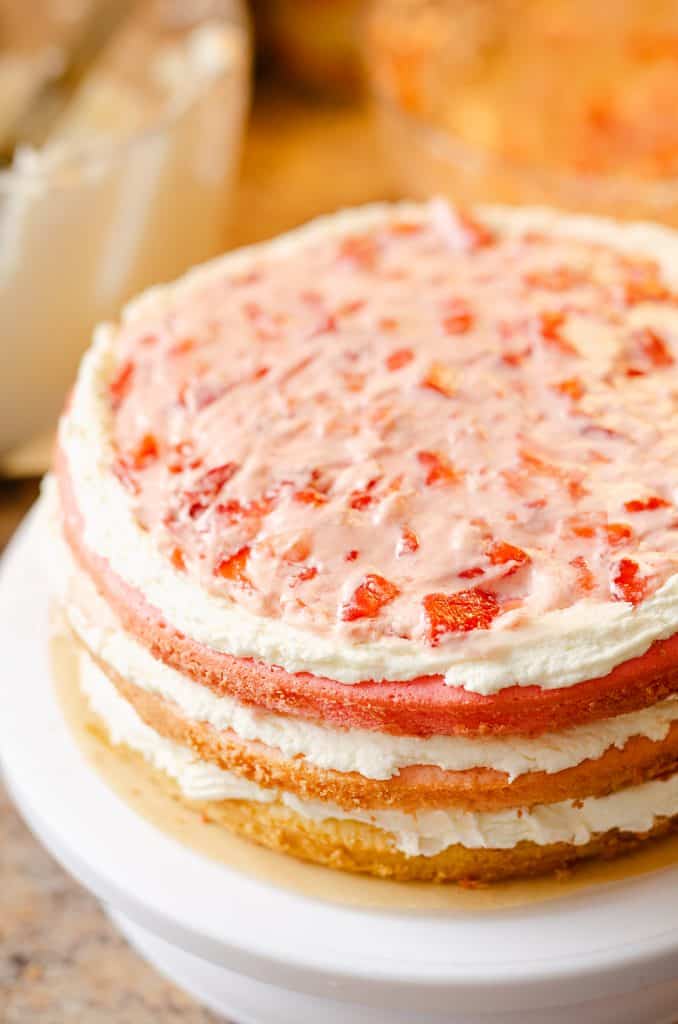
Spread a thin layer of plain buttercream in the very center of your cake stand. Top with the white cake layer.
Add the plain buttercream to a piping bag and pipe a circle of buttercream on the very edge of the top of the cake. This will keep the strawberry buttercream mixture secured nicely inside the cake so it doesn’t spread to the outside.
Spread a thick layer of strawberry buttercream inside the circle of plain buttercream. Top with the light pink cake layer. Continue layering the cake from lightest to darkest with strawberry buttercream between each layer. Finish decorating the fresh strawberry cake with the plain buttercream.
Ombre Birthday Cake
This ombre birthday cake on it’s own wasn’t all that impressive from the outside with a simple coat of plain buttercream, but it is striking when cut open with it’s layers of pink cake.
There are lots of ways to jazz up the cake decorating with minimal efforts though. I opted to top the cake with donuts and candles for our “Two Sweet” birthday theme.
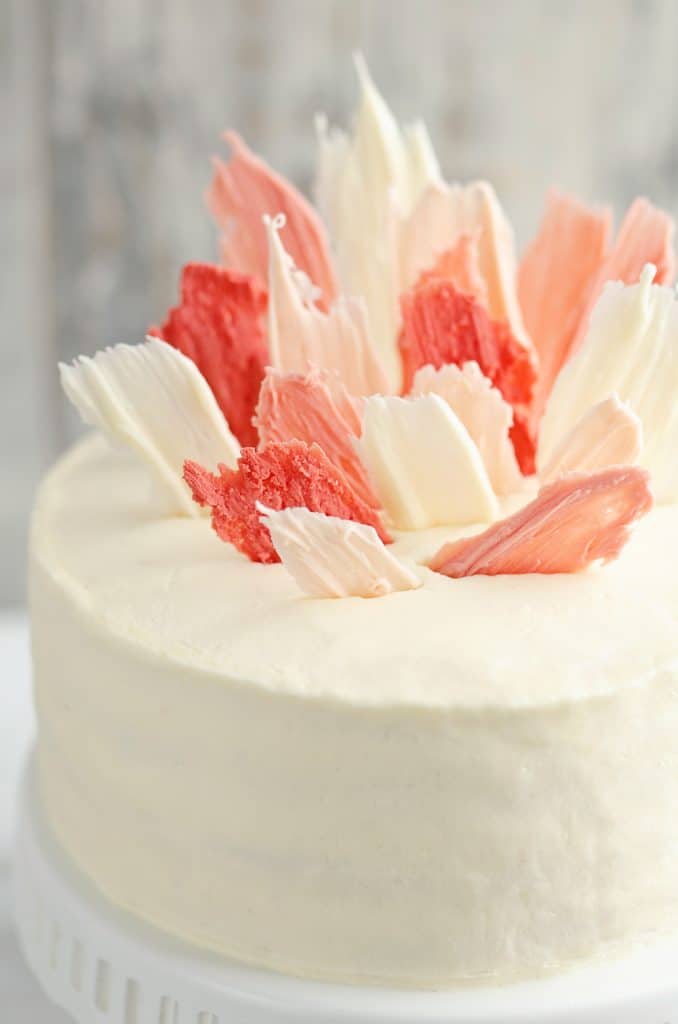
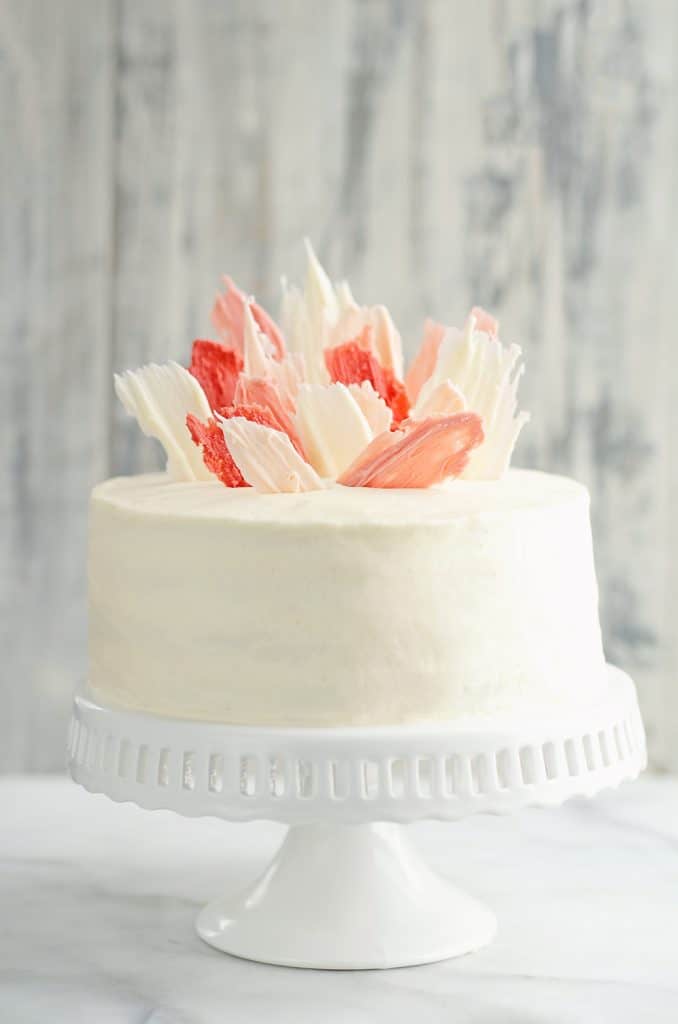
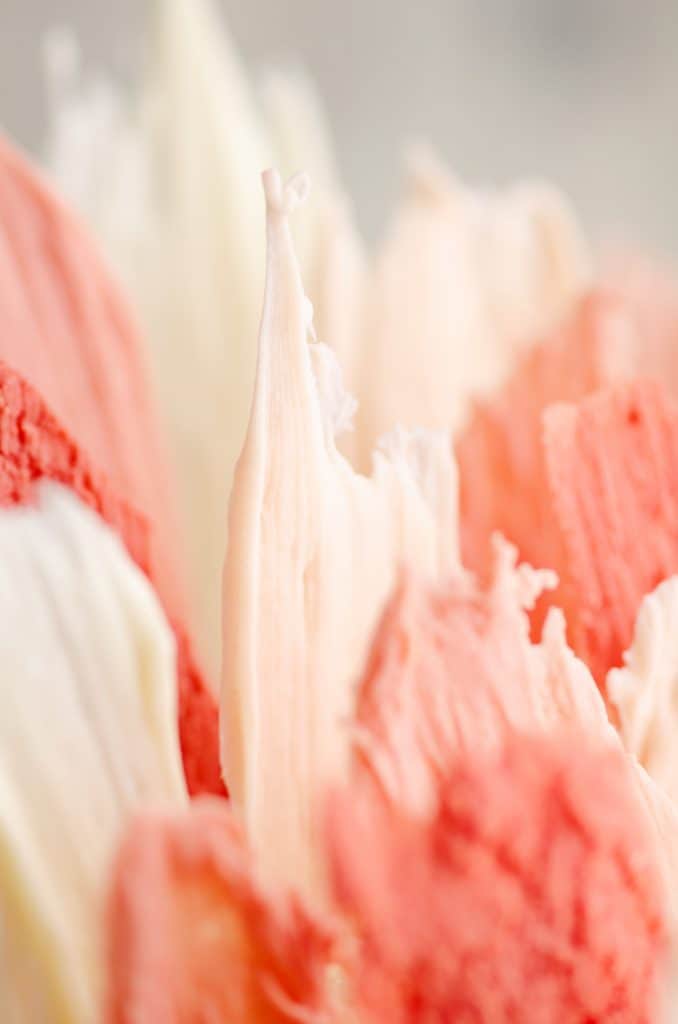
White Chocolate Brush Strokes
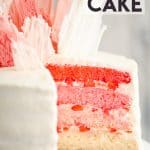
If you are making this fresh strawberry cake for Valentine’s Day or a special girl’s birthday, you can dress it up with some simple colored white chocolate brush strokes.
Melt a half bag of white chocolate chips and using a pastry brush, brush some of the white chocolate on a piece of parchment paper or waxed paper in various sizes.
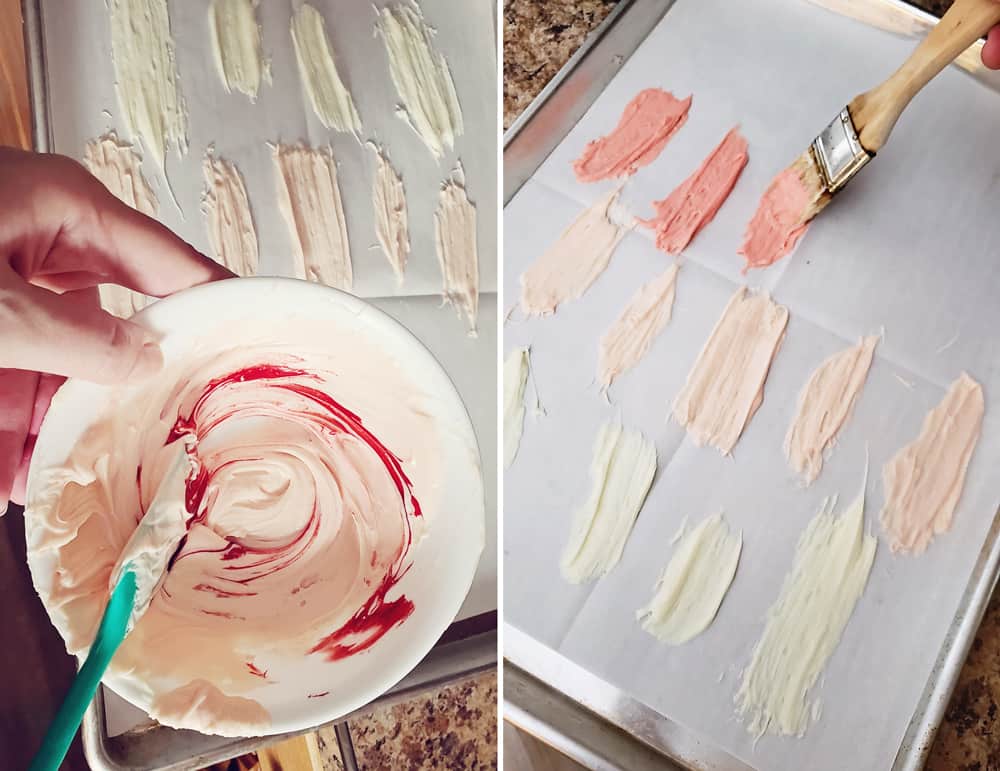
To color the white chocolate, follow the same principal as dying the cake in incremental steps. Add a little red candy dye at a time and continue brushing the chocolate onto the parchment in various sizes and shades of pink. Let them cool until hard. Using a sharp knife, poke a slit into the top of the cake before inserting each brush stroke to allow it in gently.
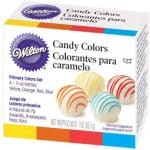
Be sure to purchase candy dyes if you are going to color your chocolate. Unfortunately you can’t use the gel food dyes or water dyes because the liquid in them will cause the chocolate to seize up.
Decorating ombre cakes
I just want to add a few extra tips I have picked up when it comes to decorating cakes. If you opt to decorate the cake in a clean crisp layer of buttercream, I highly recommend this very affordable set of a rotating cake stand and spatulas. Having the right tools really does make all the difference.
Unless you are a pro, unlike myself, you likely won’t have a perfectly smooth finished layer. That is perfectly acceptable! IF you are like me and it drives you a little nuts though, use a dry cotton cloth or paper towel with no texture and pat the dried buttercream smooth. It really does help smooth out small imperfections.
If you don’t want the headache of trying to smooth buttercream evenly over the cake, go for the rosette method! This is a full proof method that just about anyone can do to accomplish a beautifully finished cake.

Fresh Strawberry Ombre Cake
Equipment

Ingredients
Cake
- 1 c. salted butter
- 1 1/2 c. sugar
- 2 large eggs
- 3/4 cup sour cream
- 1 c. milk
- 2 teaspoon vanilla extract
- 1 tsp. almond extract
- 1 tsp. salt
- 2 1/2 c. cake flour or 2 1/4 c. all-purpose flour but you will get a lighter cupcake with cake flour
- ½ tsp. baking soda
- 1 1/2 tsp. baking powder
- red food dye gel or paste
Buttercream
- 1 c. shortening butter flavored
- 1 c. salted butter
- 1 1/2 tsp. vanilla extract
- 1/2 tsp. almond extract
- 32 oz. bag powdered sugar
- 1 qt. strawberries
- 2 Tbsp. milk
Chocolate Brushstrokes
- 1 c. white chocolate chips
- red candy dye
Instructions
- Move both of your racks into the center of your oven. Preheat the oven to 350°.
In a large bowl, beat the butter and sugar until smooth. Add the egg, extracts, milk and sour cream and blend until smooth. - Add the dry ingredients to the bowl and beat slowly until well combined and only a few lumps remain.
- Prepare 4 9" round cake pans by coating them in butter. Scoop 1/4 c. flour into one of the pans and shake around the pan so all of the butter is coated in flour. Dump the excess flour into the next buttered pan and repeat until all pans are buttered and floured.

- Scoop 1 1/3 c. batter into one of the floured pans and set aside.
- Add a 1/16 tsp. red dye to the cake batter and mix until the color is even. Scoop 1 1/3 c. batter into another pan.
- Add an additional 1/8 tsp. red dye to the batter and mix until the color is even. Scoop 1 1/3 c. batter into next pan.
- Add 1/4 tsp. red dye to the remaining batter and mix until color is even. Pour the batter into the last pan.

- Place all of the pans in the oven and bake for 25-30 minutes, or until the edges are just lightly golden and a toothpick inserted in the center comes out clean.
- Allow cake to cool to room temperature.
- Meanwhile, in a large bowl, beat the shortening and butter until smooth and fluffy. Add the vanilla, almond extract and mix until smooth.
- Add the powdered sugar 1-2 cups at a time, mixing well between each addition.
- Remove 1/3 of the buttercream into a medium bowl. Add the 2 Tbsp. milk to the 2/3 bowl of buttercream and beat the frosting for an additional 4-5 minutes until light and fluffy.
- Chop the strawberries finely and add them to the 1/3 bowl of buttercream. Mix until well combined.

- Using a butter knife, cut around the edges of the pan to release the white cake from the pan.
- Place your hand over the cake and invert the pan.
- Very gently allow the cake to release from the pan into your hand. Do not try to rush the process or the cake will break. If it isn't coming free from the pan, use the butter knife to work around the edges of the pan pushing gently in towards the center to release the bottom edges and repeat the process.
- If the cake is mounded in the center, use a long bread knife to carefully cut the top off the center so they are flat.
- Spread a thin layer of plain buttercream in the very center of your cake stand. Top with the white cake layer.
- Add the plain buttercream to a piping bag and pipe a circle of buttercream on the very edge of the top of the cake.
- Spread a thick layer of strawberry buttercream inside the plain buttercream circle. Top with the pink cake.
- Continue layering the cake from lightest to darkest with strawberry buttercream between each layer.

- Frost the outside of the cake with a thin layer of buttercream for a crumb coat. Allow to set for 10 minutes.
- Finish the cake with an even thick layer of buttercream.
- Add the chocolate chips to a small microwave safe bowl. Microwave in 30 second increments, stirring vigorously after each increment. Be sure not to over cook or it will seize up.
- Once the chocolate is smooth brush 1/4 of the white chocolate on a piece of parchment paper or waxed paper in various sizes.
- Add a tiny dot of red candy dye (NOT water or gel dye) and stir until well combined. Brush 1/3 of the chocolate onto the parchment in various sizes.
- Continue adding additional candy dye and making brushstrokes in various shades and sizes.
- Let the chocolate cool until hard.
- Using a sharp knife, poke a slit into the top of the cake before inserting each brush stroke to allow it in gently.
- Serve and enjoy within 24 hours!


Jackie Patton says
I took a chance and gave this a try. The cake was absolutely yummy but the middle of it did not rise. Any advise. However I did not use large eggs, may this have been a problem?
Danielle Green says
How many layers did you make with the cake? Where they perhaps much thicker?
Julie says
My girls loved this cake! It was so fun to make and the layers were incredible! We’ll be making it again!
Megan says
My mom and I tackled this for my niece’s birthday and it was a HUGE hit! My niece was in love, thanks for sharing!
Alison LaFortune says
Gorgeous cake. Love the ombre!
Malinda Linnebur says
Absolutely beautiful!!! Bookmarking so I remember this cake to make for my daughters birthday!